Simple Chicken Stew (excerpt from Appendix A)
Although it's a single-animal-source meal, this stew is easy to make and yielded about 3 days of meals for Miss Lilly, so it was also economical.
Note: Miss Lilly was a medium-size dog who weighed about 50 pounds, or 23 kilograms.
ingredients
* 1 whole chicken, medium size (approximately 3 lb or 1.4 kg), ready to be cooked (i.e., from a grocery store, butcher shop, or farmer's market)
* 1 bag of frozen mixed veggies, 1 lb (16 oz or 450 g)
* salt “to taste,” dried herbs (optional)
Feeding Miss Lilly
on feeding dogs a great, nature-inspired diet
revised edition
Dr Christine King
PRINT EDITION
USD: 23.96 | AUD: $32.92
eBOOK EDITION
USD: $12.10 | AUD: $17.10
notes
A cooked chicken is 60–70% meat, so a 3-lb chicken yields about 2 lb of meat after cooking. That makes this simple stew about 67% meat and 33% veg (or a ratio of close to 70:30). Sometimes I added more veggies if I felt Miss Lilly needed a bit more veg in her diet that week, but I never went over 50% veg. When I did add more veg, I usually threw in some spinach, fresh or frozen, about 8 oz (230 g) if frozen or a couple of big handfuls if fresh.
In the chicken stew I made recently to illustrate this recipe, the chicken weighed close to 1.8 kg (4 lbs) and I used a 1-kg (2.2-lb) bag of frozen veg, because that's one of the two main sizes (500 grams and 1 kilogram) frozen veggies come in here (Australia). Cooked, this chicken would have yielded about 1.2 kg (2.6 lb) of meat, so the stew would be about 55% meat. Had I used the smaller bag of frozen veggies, the stew would have been over 70% meat.
Either would be fine for the average dog, so there's room here for other factors (budget, appetite, ethical considerations, etc.) to come into play, as you like. There's no need to get too caught up in the numbers. As long as the stew is more meat than veg, your dog will love it.
The chicken. Whenever possible, I used pasture-raised chicken, as it yields more lean meat per pound and healthier fats than even free-range, organic chicken. (I'm told it also tastes better, and Miss Lilly seemed to concur.)
For the "free-range" label, the USDA requires only that the chickens have some outdoor access. It does not specify the type or size of the outdoor area; it could simply be (and often is) a door to a dirt pen outside a huge poultry shed. Nor does it specify the amount of time the chickens get to spend outside each day, which could be zero (and often is), as long as they have outdoor "access." In comparison, pasture-raised chickens forage outside on grass and other vegetation all day long.
When you look at pasture-raised and free-range chickens side-by-side after getting them out of their packages, there really is no comparison. In my considered opinion, pasture-raised chicken is worth every extra penny per pound. In fact, when I had to choose between "organic" and "pasture-raised/grass-fed" (but not organic) for any type of meat, I chose pasture-raised or grass-fed every time. (Although ideal is both.)
The veggies. Here, though, I chose organic whenever possible. Because pesticide and herbicide use are so prevalent in conventional food production, and potentially harmful genetic modifications are creeping in without our knowledge, I bought organic veggies almost exclusively.
For this stew, I liked the veggie blends that are diverse and really colorful (my favorite contained red bell peppers, carrots, yellow squash, green beans, and zucchini), although I avoided those that included corn. Even if it's organic, and thus free of genetic adulterations, Miss Lilly didn't do well with corn. She tolerated it in small amounts, but she did better without it.
Alas, in the quick shop I did for these illustrations, there was no pasture-raised chicken available, and only small bags of organic single veggies. Compromise is fine when you just have to make it. The recommendations in this book are just that: recommendations. The most important elements are fresh, whole foods that are species-appropriate (i.e., minimal processing, and more meat than veg); with as much variety as you can manage; and freshly prepared and fed with love and care.
instructions
1. Remove the chicken from its package and take out the giblets.
Chicken giblets typically include the neck and liver; and if you're lucky, you'll also get the heart and gizzard. In other words, a variety of organs, which makes the giblets especially good dog food.
2. Rinse the chicken, inside and out, under running water (cold or warm); also rinse the giblets.
The types of bacteria on/in raw meat that are most likely to cause illness grow exceptionally well in liquids such as the bloody fluid that leaks out of a chicken carcass. So before I did anything else, I thoroughly rinsed the outside of the chicken and its body cavity under the tap.
I fed Miss Lilly the giblets raw (she loved Chicken Day!), but first I rinsed them under running water. The liver quickly gets waterlogged, but as it's the organ most likely to be contaminated, I did give it a quick rinse.
If I was at all concerned about the freshness of the chicken, I cooked all of it, including the giblets. I kept them in the fridge while the chicken did most of its cooking, and added them to the pot with the veggies (step 5) so that they didn't overcook and lose some of their nutritive value, yet any bacteria they contained would be killed by the heat.
With a nice, fresh chicken (and by that, I simply mean it had no funky smell or other signs of spoilage), I also removed the wings at the elbow using kitchen shears* and fed Miss Lilly the raw wings as a source of calcium.
(See Chapter 2 for a detailed discussion on meeting the dog's calcium needs with a home-made diet.)
* I stretched out the wing and snipped through the skin on the inner angle of the elbow — where the wing changes angle (it really does look like an elbow) — aiming for the joint itself. I then stretched the wing out further and cut through the ligaments and the exposed joint space to remove the wing. (It takes longer to describe it than to do it!)
By the way, I wore rubber gloves (the type used for washing dishes) while handling the raw chicken. Not only did the gloves protect my hands from chicken germs, but they aided my grip. Raw chickens are like buttered footballs! When the chicken was in the pot, I washed my gloved hands and the kitchen shears thoroughly with hot water and dishwashing detergent.
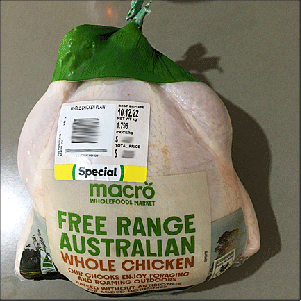
Fresh whole chicken from the supermarket. This chilled, but not frozen, chicken weighed just under 1.8 kg (4 lb), without its giblets (neck, heart, liver, gizzard).
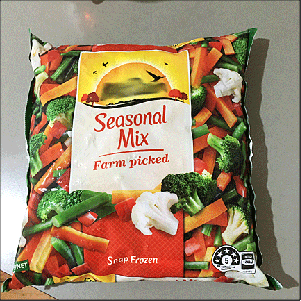
A 1-kg (2.2-lb) bag of frozen mixed veggies; the more colourful, the better. This one contained broccoli, carrots, cauliflower, green beans, and red bell pepper (capsicum).
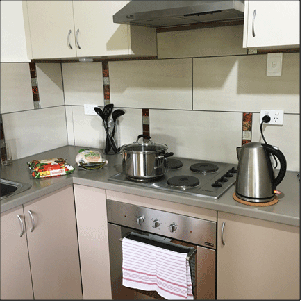
You'll also need a large soup or stock pot with a lid. (This one has a capacity of 6 litres or 6 quarts.) It speeds up the cooking process if you add boiling water at the start, so a kettle comes in handy as well.
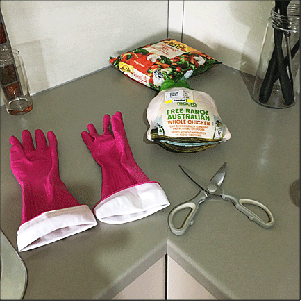
A pair of rubber gloves and some kitchen shears make the job (and clean-up) easier...
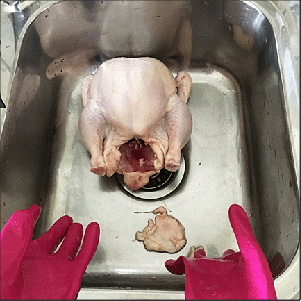
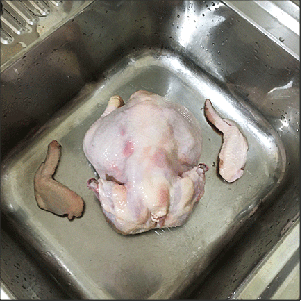
Put the kettle on to boil. In the meantime, and wearing rubber gloves, remove the wad of fat that's often found in the cavity at the back end of the chicken. I generally threw the fat in the bin, but it can be added to the pot if the dog needs more fat in her/his diet.
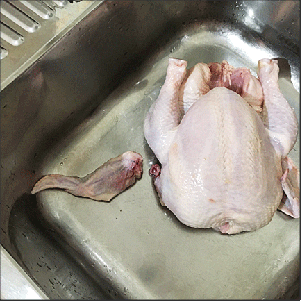
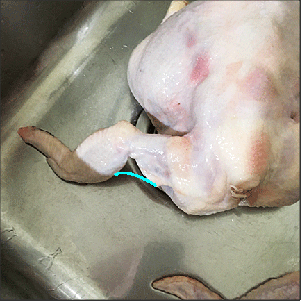
Using kitchen shears, remove each wing at the elbow. Stretch out the wing and snip through the skin at the inner angle of the elbow. Here, I've drawn a light-blue line to show the line of the skin before I snipped through it. (See below for an intact elbow...)
Next, fully extend the elbow so that you can see the joint. Snip through the joint, including its tendons, ligaments, and skin, to remove the wing. Cut between the bones that form the elbow joint. The glistening, white cartilages on the joint surfaces point the way.
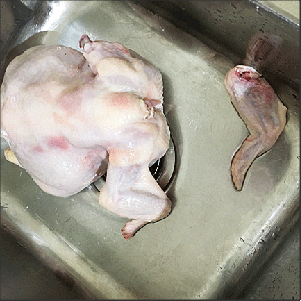
Turn the chicken over and remove the other wing at the elbow in the same way. (In this photo, I have yet to snip through the skin at the inner angle of the elbow on the remaining wing, so you can see what it looks like intact.)
The chicken is lying on its breast, its back uppermost. Both wings have been removed at the elbow, and the chicken is now ready to go into the pot. I fed both wings to Miss Lilly as soon as I'd removed them. She would always be waiting at my feet...
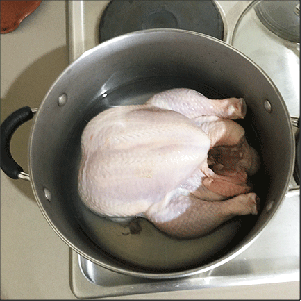
Place the chicken in the pot, on its back (breast up), as close to centre as possible (ideally, not touching the sides). Add a few inches of hot water, enough to fully submerge the backbone and tail. This is usually enough water to prevent the pot from boiling dry at a simmer, while leaving you with a stew instead of a soup when you're done. Add salt and herbs "to taste."
3. Place the chicken in a large soup pot and add 3–4 inches (8–10 centimeters) of water; add salt (and herbs, if desired).
The pot I used was an 8-quart (8-liter) stockpot with lid. It was large enough that the chicken fit easily and the sides of the pot came up well above the top of the chicken. There has to be room for the veggies later, and I wanted to make sure that the pot couldn't boil over if I left it unattended (which I generally did).
I added enough water that the pot wouldn't boil dry during cooking, but not so much that I end up with chicken soup instead of stew. Chicken soup is not so bad, but it takes up more space in the fridge, I'd have to feed more of it to satisfy Miss Lilly's hunger, and she'd pee more after a soup than a stew.
With the stockpot I had, I laid the chicken on its back (breast uppermost) and then added enough water that the backbone was completely submerged and water partially filled the body cavity. To speed things up, I sometimes boiled the kettle and added the boiling water to the pot.
I added a teaspoon or so of salt and a variety of dried herbs. I typically used a little rosemary, sage, thyme, and parsley — a classic aroma and flavor profile! My kitchen smelled wonderful as the chicken cooked.
As for how much salt and herbs I used, I never bothered to measure. I like to cook for myself, so I just used the quantities I'd typically find enjoyable in my own cooking. If you're not a cook yourself, then err on the side of using less salt and herbs. Under-seasoning is the lesser “sin” here, as chicken is a flavor in its own right. Tom Colicchio (tough judge on the reality TV show, Top Chef) might object, but your dog won't mind under-seasoned food.
4. Place the lid on the pot, bring to a boil, and then lower to a simmer; cook until the meat is just beginning to pull away from the bone (about 45 minutes).
With a medium-size chicken, it usually takes about 45 minutes at a simmer until the skin at the lower end of the drumstick has pulled away from the bone. That was my cue to add the veggies because I knew that, by the time the veggies were fully cooked and infused with chicken flavor, the chicken would be cooked all the way through and easy to debone.
5. Add the frozen veggies, bring the pot back up to a boil, then lower the heat and simmer until the veggies are fully cooked (another 15 minutes or so).
I usually added the veggies straight out of the freezer — mostly because I'd forgotten to pull them out of the freezer in time to thaw! — so I'd bring the pot back up to a rolling boil before turning it down again to a simmer. If I waited for the pot to come back up to a boil on its own after adding the frozen veggies, the stew took forever to finish cooking. Ideally, I'd have the veggies thawing at the sink before I even put the chicken on to cook.
To avoid overcooking the veggies, I kept an eye on them after they'd been simmering for about 15 minutes. I wanted them to remain brightly colored but be soft all the way through. The pale-fleshed veggies, such as yellow squash and zucchini, were my testers: when their flesh was translucent, I knew they'd be fully cooked and infused with chicken flavor.
If I was adding frozen spinach, I added it in the last 5 minutes of the veggies' cooking time. Spinach very quickly overcooks, so because freezing it softens the leaves enough, I didn't actually cook it for this stew; I just let it thaw in the hot stew. If I was adding fresh (raw) spinach, I added it after everything else had cooked, after the heat had been turned off, but while the stew was still really hot. I simply wanted the fresh spinach leaves to wilt and mix in well with the other veggies and the chicken.
6. Once the veggies are cooked, turn off the heat and put the pot in the sink; fill the sink with cold water up to the level of the water in the pot.
When I needed the stew to cool quickly so that I could feed it to Miss Lilly, I filled the sink with cold water, up to the level of the liquid in the pot. I also took off the lid and opened the window over the sink. When I had the luxury of hours before I fed the stew, I would simply turn off the heat and set the pot aside on the stovetop to cool more slowly.
The trick, though, is to not let the chicken get cold before trying to debone it. The meat pulls away from the bone much more easily when the chicken is still warm (but not so hot that it burns your hands).
7. Once the chicken is cool enough to handle, remove the meat from the bones.
I used my trusty washing-up gloves for this step, too, because I didn't like having to wash chicken fat off my hands. A bonus to using gloves is that I could debone the chicken when it was hotter than my bare hands could stand. Deboning is easy when the chicken is well cooked and still warm.
8. Either discard or recook the bones.
With pasture-raised chicken in particular, I used the bones in Miss Lilly's diet as a source of calcium and other nutrients. I was less inclined to feed her the bones (other than the raw neck and wings) when I couldn't find pasture-raised chicken. If I was not feeding the bones, for safety's sake I put them into the garbage as soon as I'd deboned the chicken.
When I wanted to feed the bones, I put them in a crock pot with just enough water to cover them and I cooked them on low heat for another 18–24 hours. The goal was to make all of the bones soft or crumbly.
I didn't want the meat to cook any longer than necessary to kill any resident bacteria and make deboning easy; but I cooked the bones for a long time on low, moist heat to make them safer to feed. After their time in the crock pot, I added the now-soft bones back into the stew (which I kept in the fridge).
9. Mix the chicken meat and veggies together, transfer to storage containers, and refrigerate or freeze.
Although Miss Lilly loved big pieces of chicken, such as the breast or thigh, I usually broke up the larger pieces with my gloved hands so that the stew was a more uniform blend of meat and veggies. I then transferred the stew into storage containers and kept them in the fridge.
Some weeks I fed this stew at almost every meal until it was gone (about 3 days), although I did my best to add in other animal sources here and there along the way (e.g., a small can of kippers for breakfast or some beef heart for dinner). Other weeks I put half the stew in the fridge and the other half in the freezer. I was always glad to find a container of chicken stew in the freezer when I'd run out of fresh meat for Miss Lilly. I really should have frozen it more often!
There you have it. Easy! And quicker than you might be thinking. (It took me longer to describe it than it did to make it.) I got on with other things while it was cooking and cooling because it doesn't need any standing-over and stirring and what-not. For the effort of only a few strategic minutes here and there, I got several delicious, nutritious meals for Miss Lilly.
Note: If the bones are not being used, this stew contains too little calcium to meet the dog's needs. When I wasn't feeding bones at least a couple of times a week, I'd add bone meal powder or another powdered source of calcium to this stew, as discussed in Chapter 2.
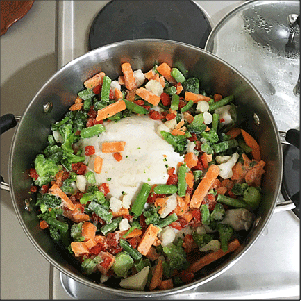
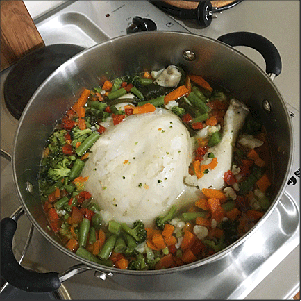
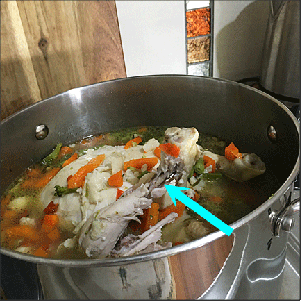
The frozen veggies have just been added to the mostly-cooked chicken. The lid goes back on and the pot is brought back up to a simmer until the veggies are cooked but still retain their bright colours.
The stew is done. The chicken is fully cooked and the veggies, still brightly coloured, are fully cooked and flavoured by the chicken juices.
Close-up of the chicken thigh, showing how the meat is falling away from the bone. Once cool enough to handle wearing rubber gloves, the chicken is easy to debone. By strategically adding the veggies toward the end of the cooking time, both components are perfectly cooked.
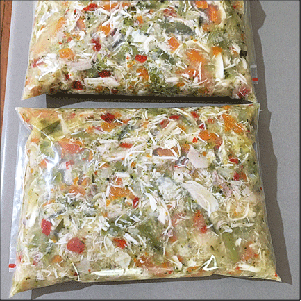
The chicken stew, cooled and ladelled into ziplock bags, ready for the freezer. I generally stored the stew in glass containers with air-tight lids when keeping it in the fridge, as they were easier to use. The ziplock bags took up less space in the freezer, though.

